


iOS (and maybe the MacOS, for all I know) is fundamentally different from Windows when it comes to defining the position and size of stuff on a screen. While in Windows development — at least with the environments based on XAML — you use containers, padding, margins and other properties to define how screen elements look, in iOS you arrange things by imposing constraints on where they reside and how big they are. That’s a more fluid approach to layout…but it takes some getting used to.
I stumbled into this when I was trying to design a launch screen for my first iOS app. It’s just a picture — which I want centered and scaled to fill the screen — and a title label, which I want centered horizontally and a bit below the top of the screen.
It took hours to figure out how to do that using the latest version of Xamarin under Visual Studio 2017. To save you some time, here’s what I learned.
You define constraints by linking two things together. For example, in the case of centering a picture (ImageView) you are linking the ImageView to the screen (which is somewhat opaquely called the Superview).
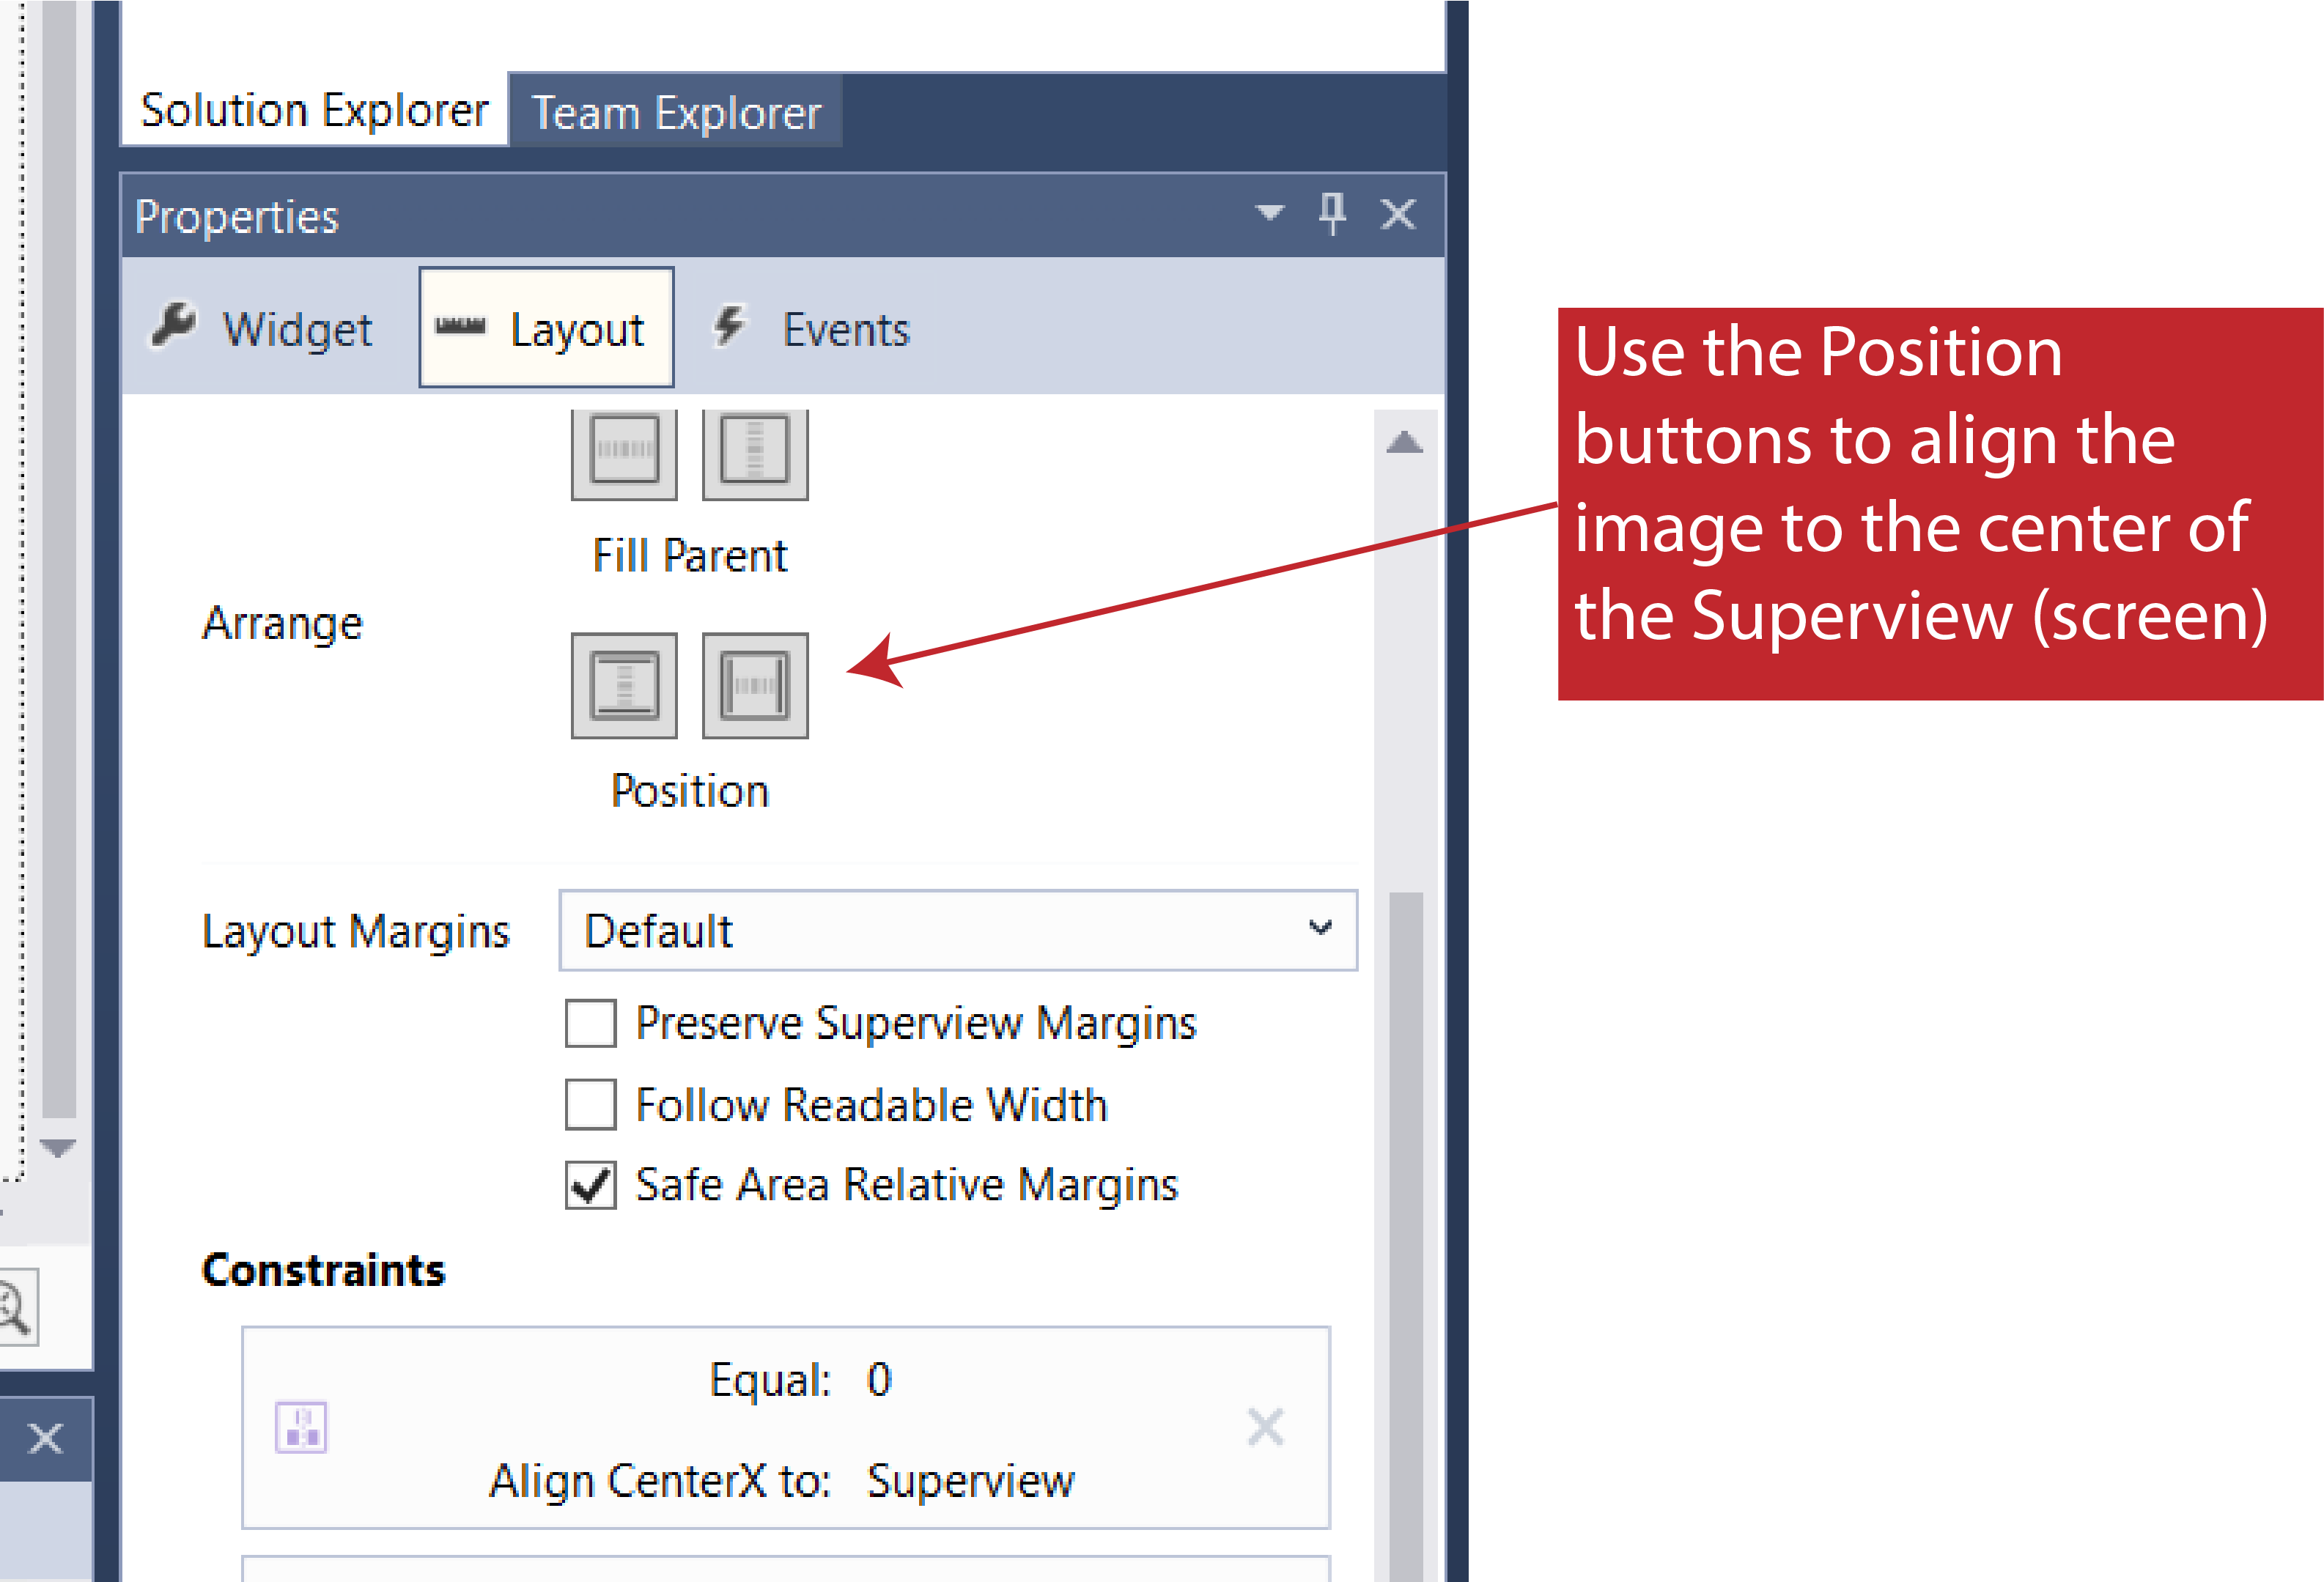
To start with, add an ImageView to the storyboard you’re working on, and center it. A convenient way to center an object is to select it, and then, in the Properties window, click the “align horizontal” and “align vertical” buttons (click the image to enlarge):
You’re now ready to start adding constraints. To do so, put the storyboard editor into Constraint Editing Mode by clicking the second of the three buttons in the upper right corner of the storyboard window, and then follow the steps outlined in the following image (click to enlarge):
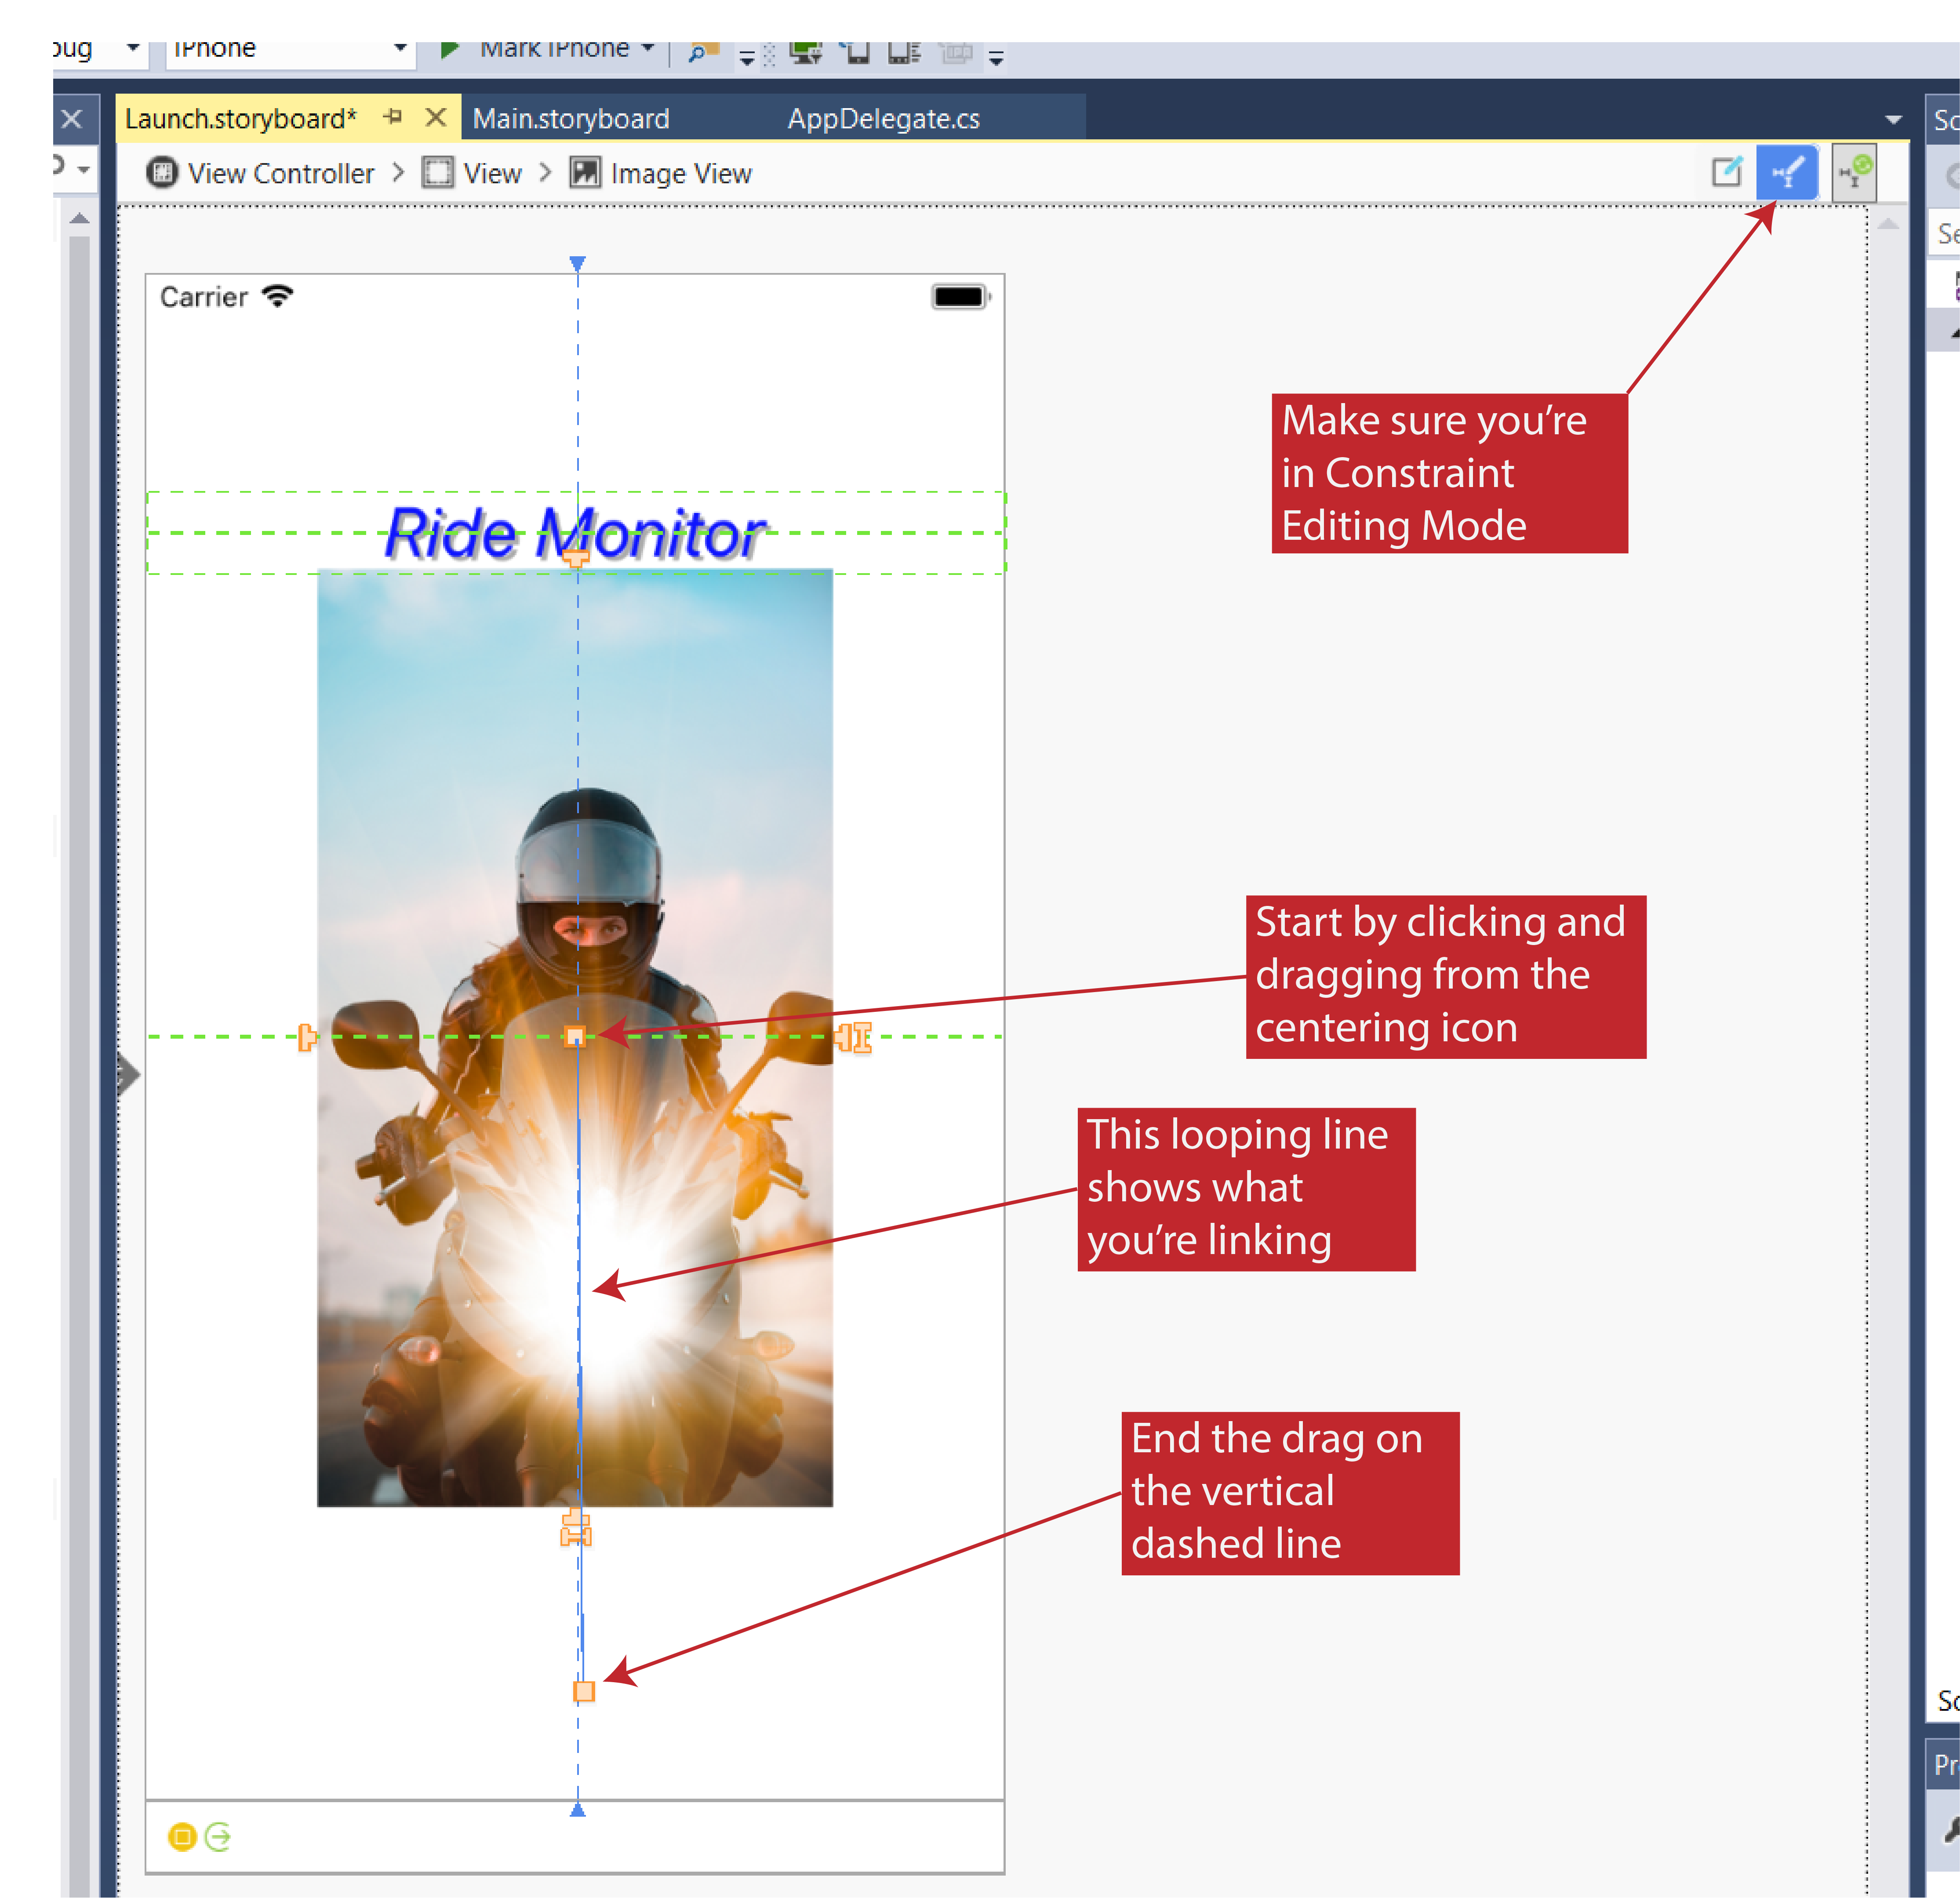
What you’ll have done is to link the ImageView to the Superview’s y-axis (that’s the dashed vertical line). This creates a constraint centering the ImageView along the x-axis (i.e., right and left direction), centering it horizontally.
I initially found that kind of counter-intuitive. Eventually I decided to think of it as “I’m establishing a constraint relationship defined relative to the y-axis, which means the constraint defines how far away I am from the y-axis, which defines a position along the x-axis”.
You follow very similar steps to define a constraint relationship relative to the x-axis, by ending the dragging along the x-axis, which centers the ImageView vertically.
Now that you’ve centered the image you’ll want to establish constraints setting its size. In my case I wanted the image to fill the entire screen/Superview. You do that by setting separate width and height constraints. Here’s how you do the height constraint (click to enlarge):
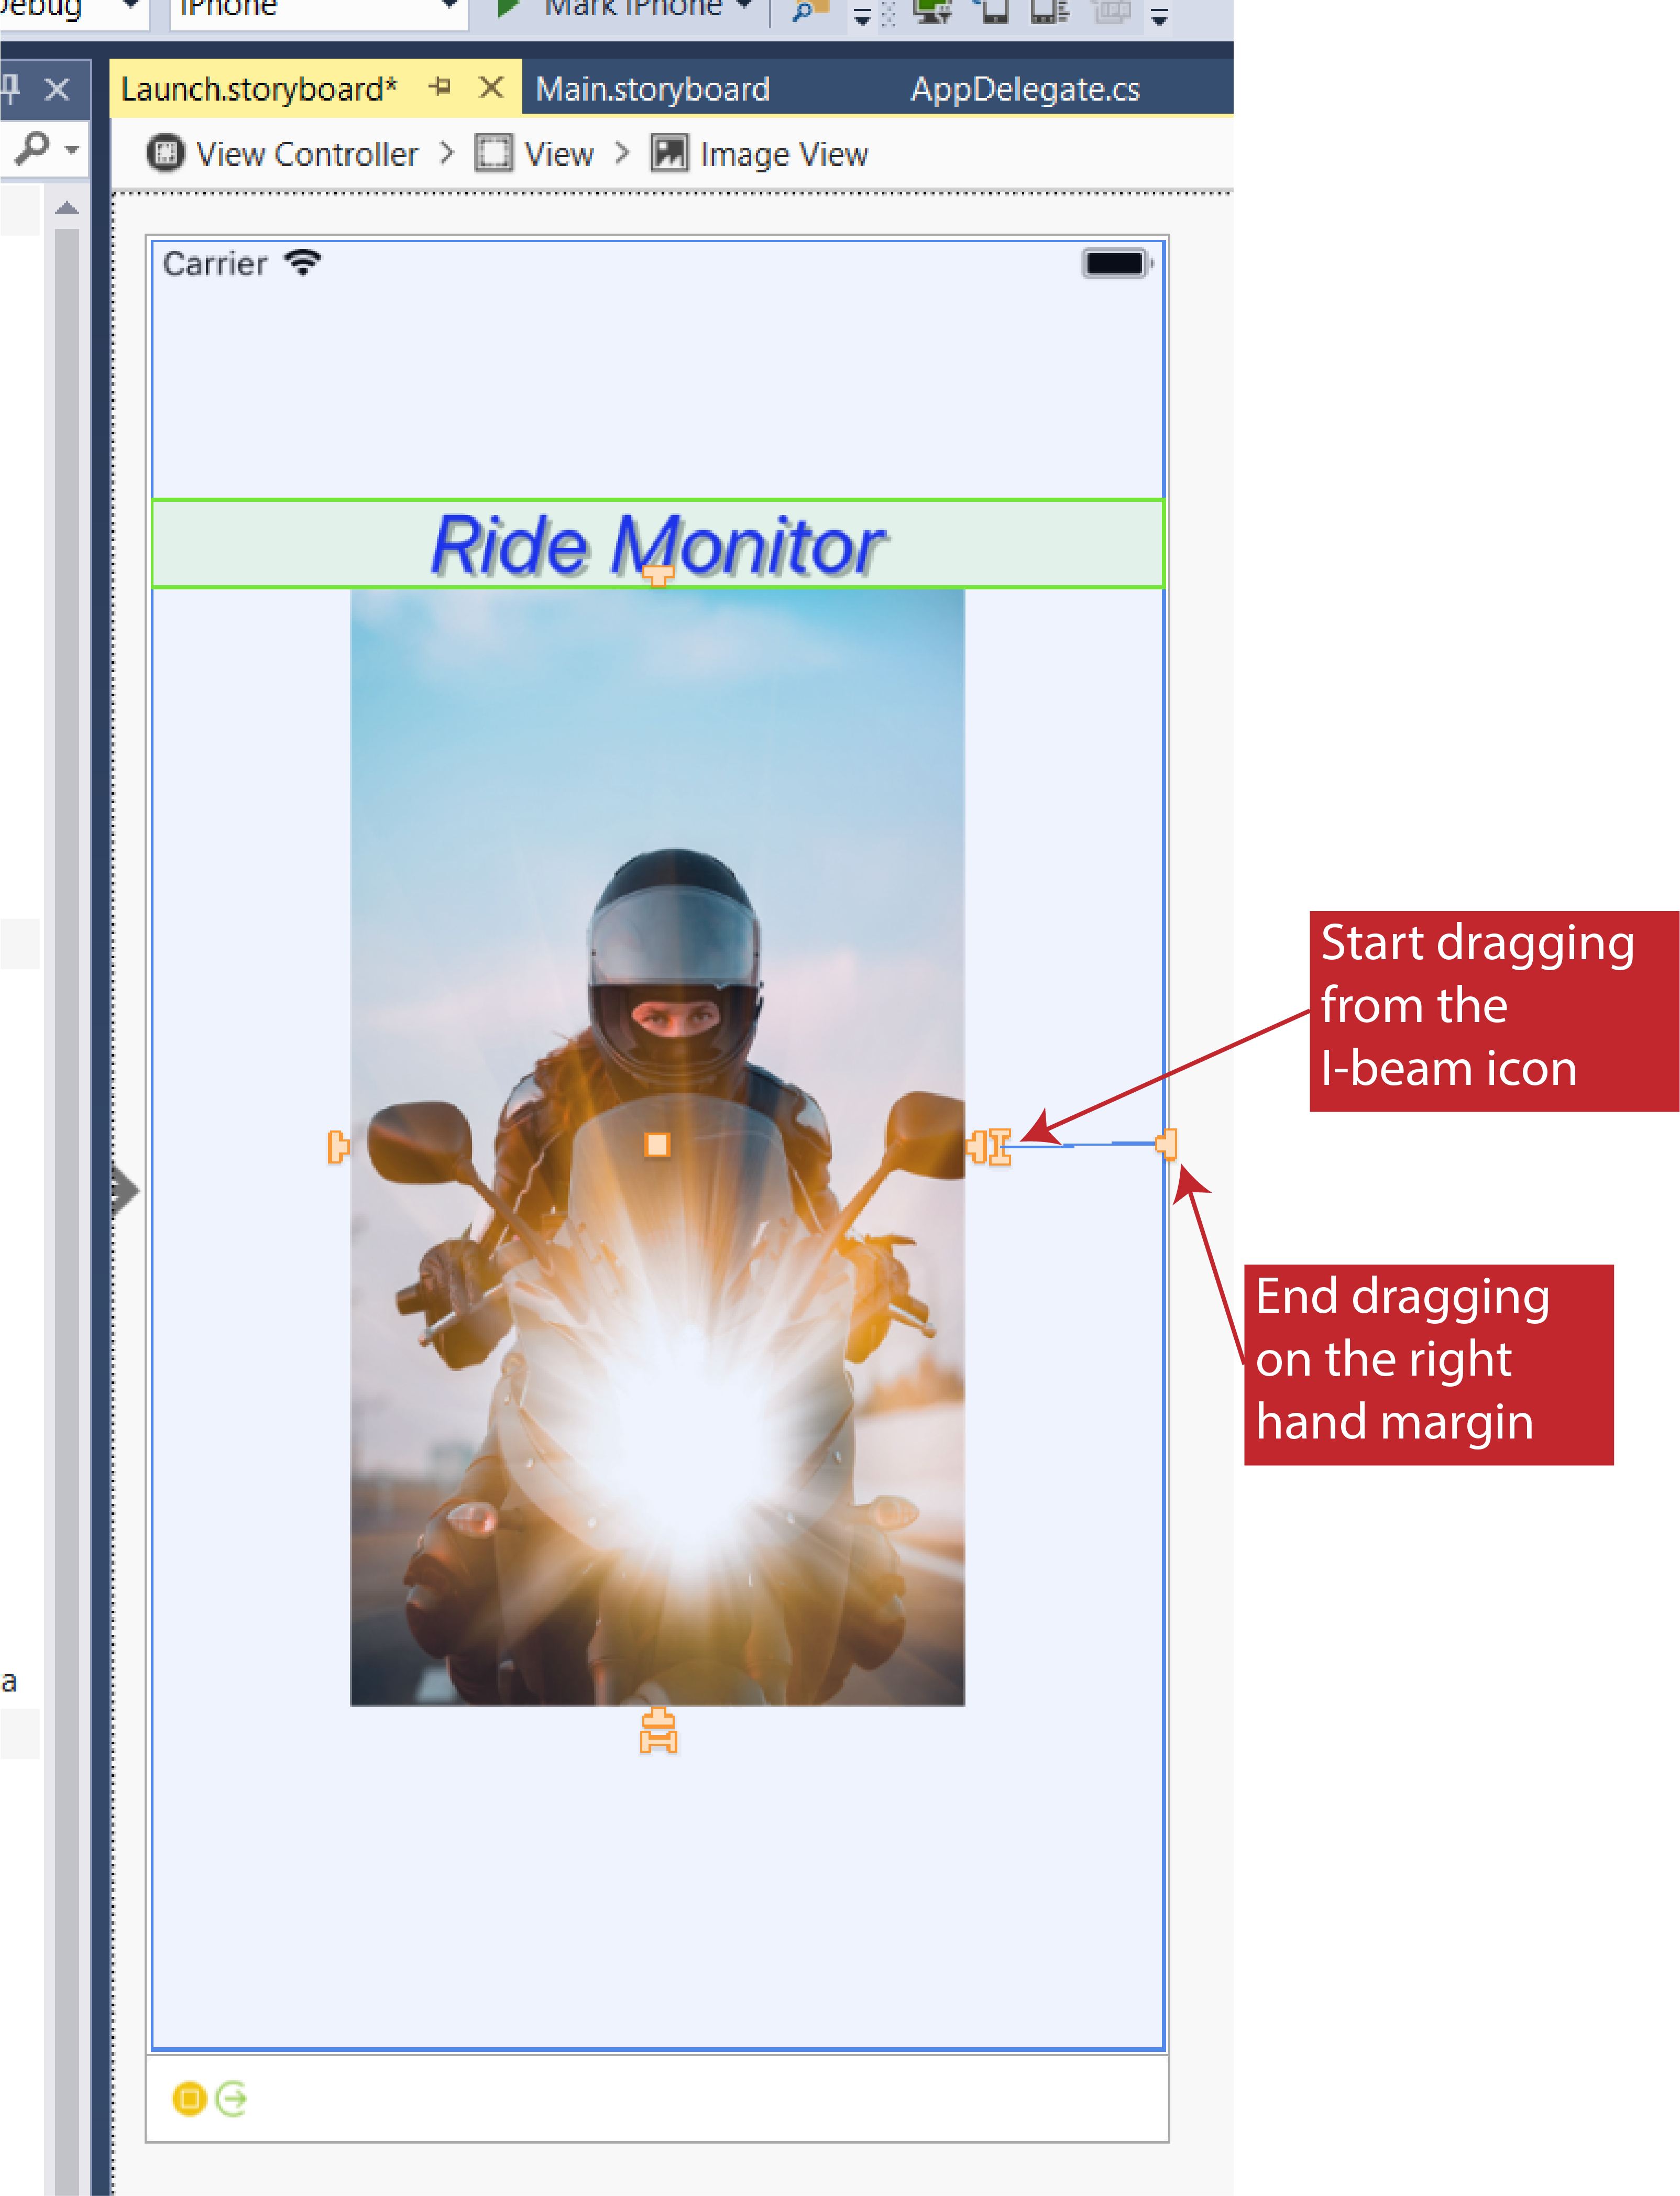
Notice that there are two controls next to each other, an I-beam and a T-beam (okay, that’s not too creative, but I hope you get which one is which). The I-beam sets constraints related to size. The T-beam sets constraints related to spacing, which we’ll get to in a moment.
By setting a height size constraint, tying the ImageView to the Superview you’re saying “make the ImageView as tall as the Superview”, which is half of what you need to do to fill the screen/Superview.
You do the analogous thing with the I-beam control at the bottom of the image and the bottom edge of the Superview to set a width constraint. Be forewarned that getting the bottom edge of the Superview selected is a little tricky; I had to do it several times on my system before it “took”.
You’ll be able to tell that everything is set correctly by checking the list of constraints for the ImageView in the Properties window (click to enlarge):
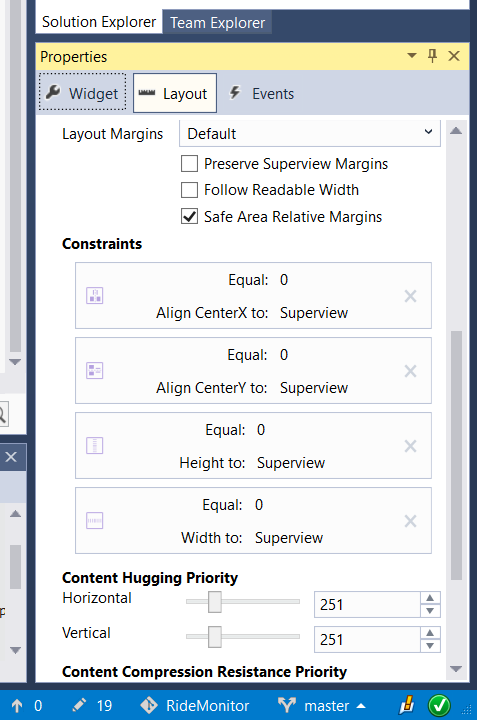
Notice that we have two Align Center constraints tying the ImageView to the Superview, one for the X direction and one for the Y direction. We also have separate height and width constraints tying the ImageView to the Superview.
If you click on a constraint you’ll drill down into it, and be able to set various properties related to it manually. I haven’t experimented with that yet, but I imagine they would let you do things like defining an offset to the relationship linking the Superview’s width to the ImageView’s width (e.g., “make the ImageView 10 pixels smaller than the Superview”).
To center the Label horizontally I duplicated the steps I took to aligning the ImageView horizontally, after selecting the Label.
Constraining the vertical position of the Label involves the T-beam controls I mentioned before. What you’re doing is establishing a constraint that says “put the Label some number of pixels away from whatever it is I’m linking to”. If you link to the Superview, you’ll be controlling how far from the edge of the Superview the edge of the Label will be. Here’s a picture of how I did that, constraining the Label to be a certain number of pixels away from the top of the Superview (click to enlarge):
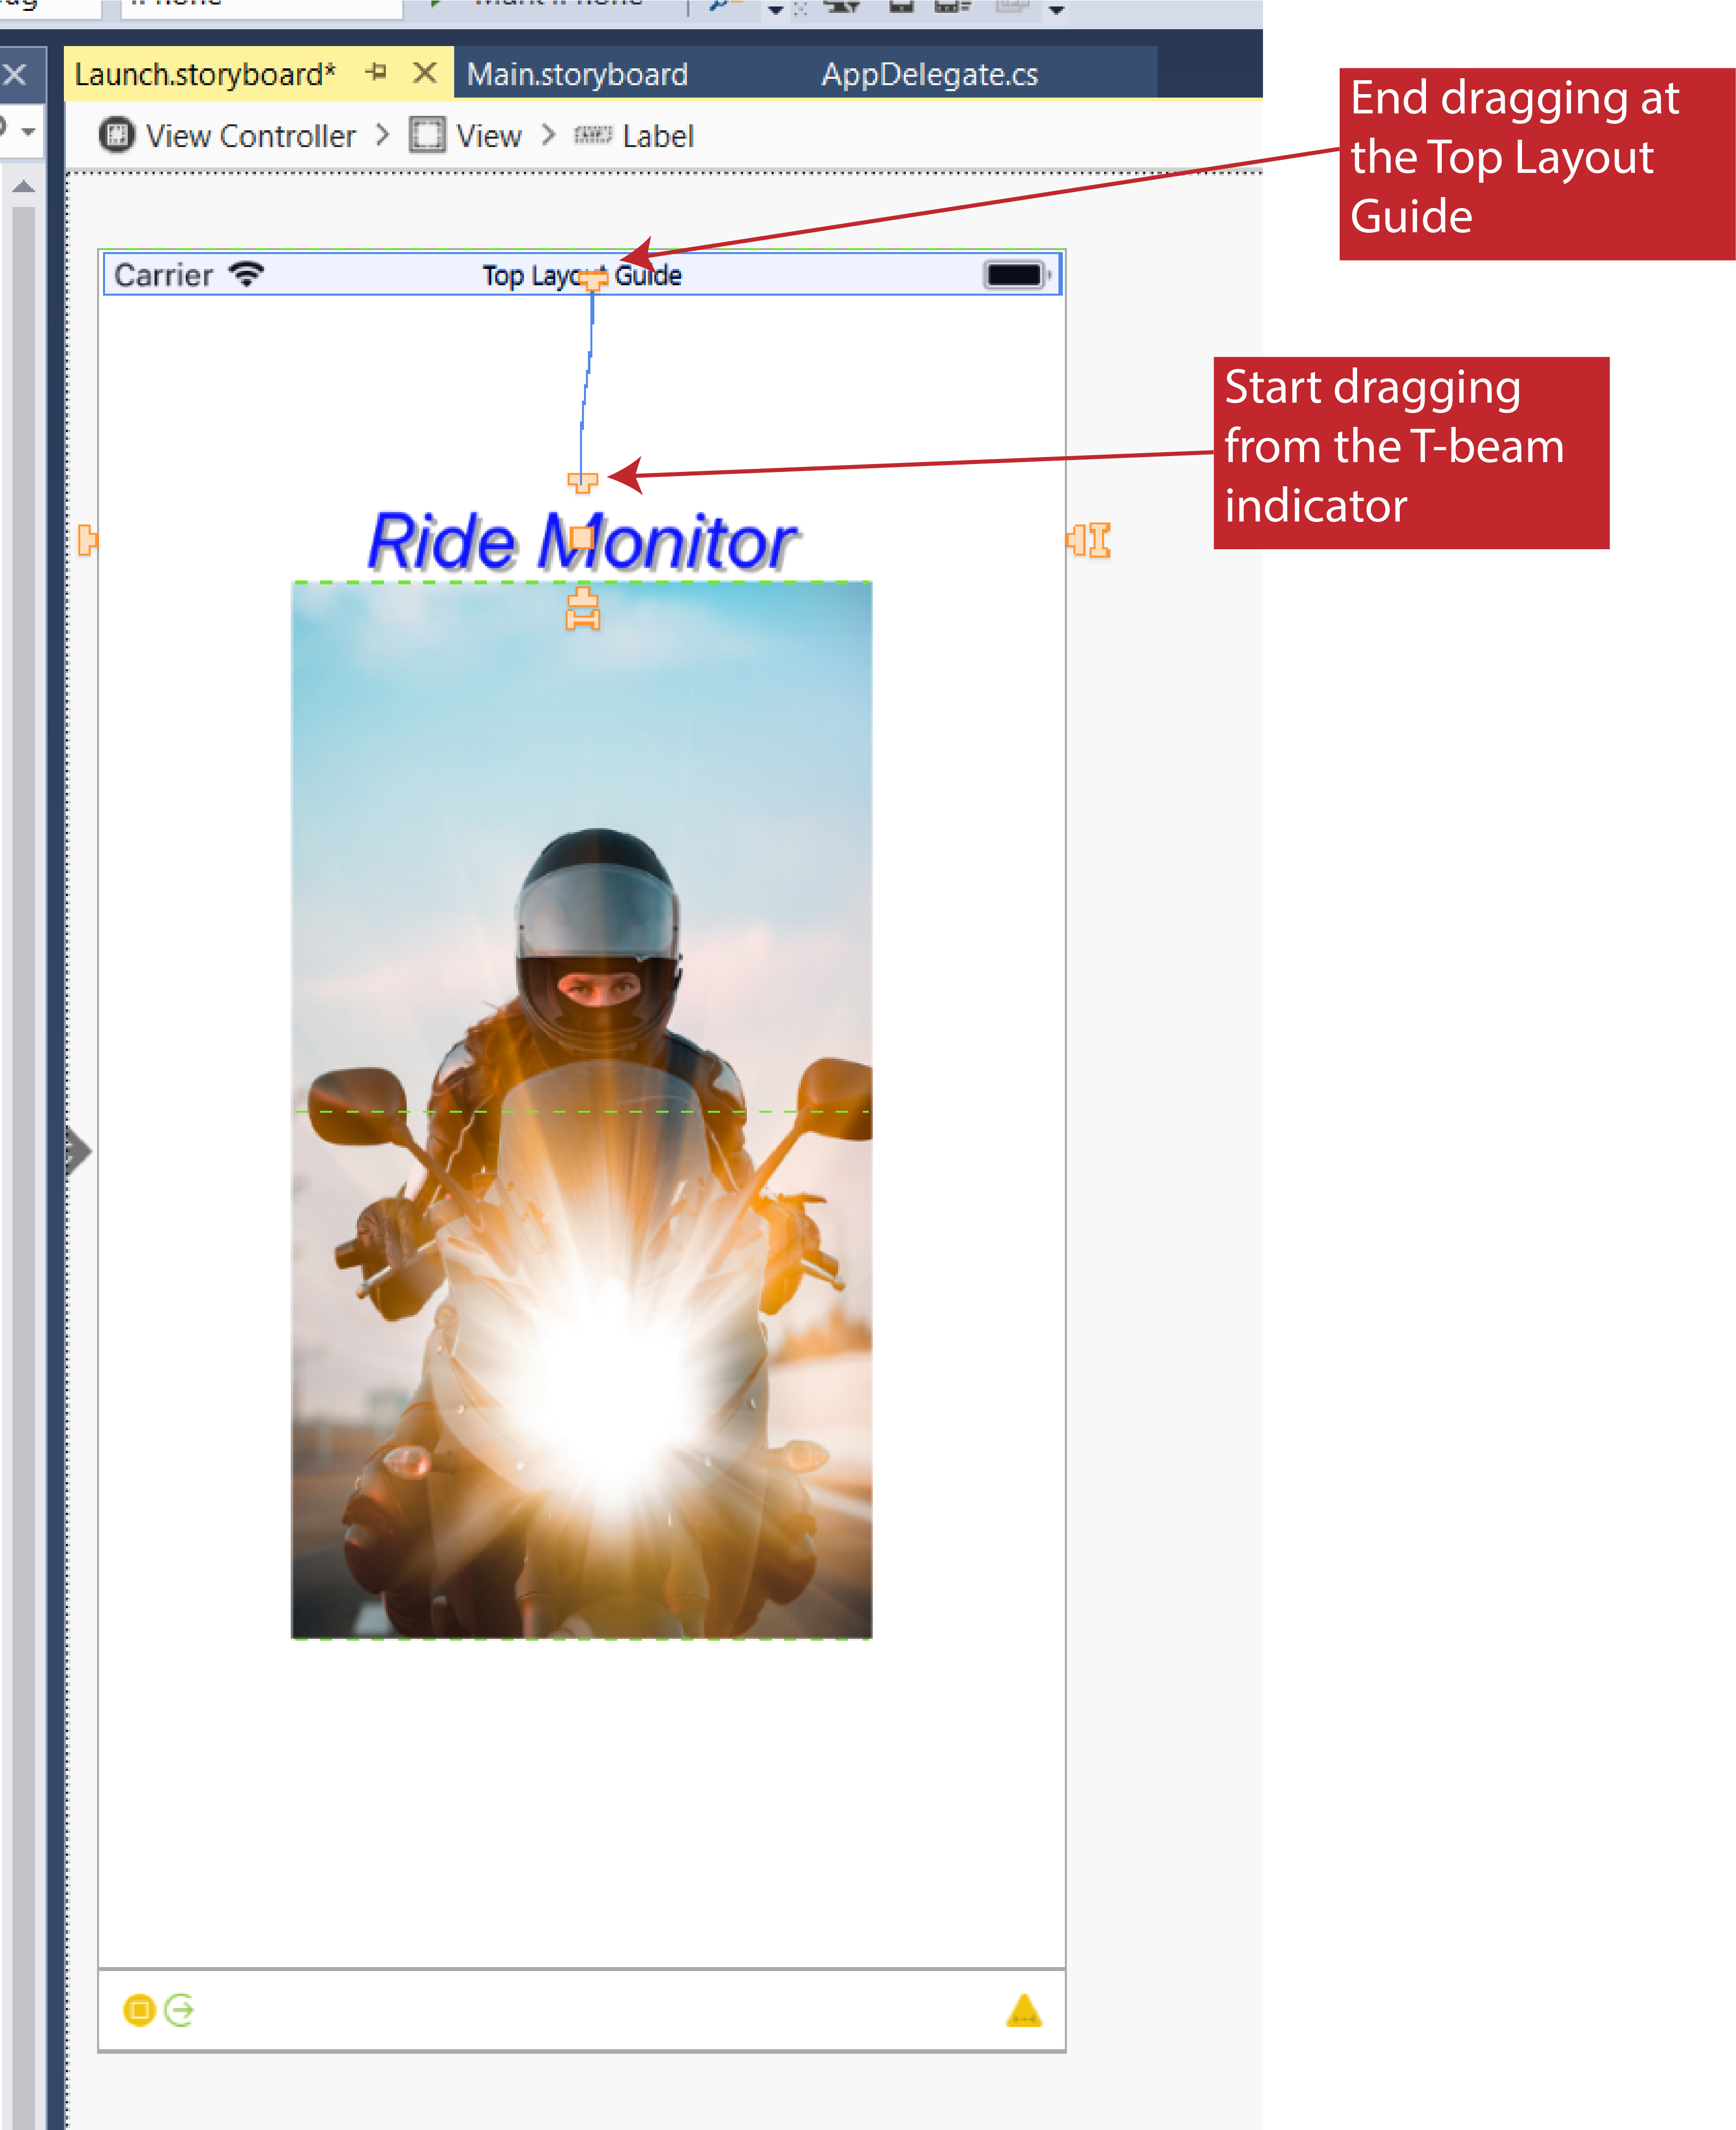
Again, if you check the Properties window for the Label, you’ll see a constraint that says the Top Space — the space between the top of the Label and the target I’m linking to, in this case the Top Layout Guide — will be a certain number of pixels (75 in my case).
If you compile and run the app onto an iPhone, you should see the constraints in operation, scaling and centering the image, and centering and placing the label near the top of the screen.
If the image not being scaled and centered in the designer bothers you, you can fix that. Put the designer back into Frame Editing Mode by clicking the first of the three buttons in the upper right corner of the storyboard window. Next, click the 3rd button. That will cause all of the constraints to be applied to what you’re seeing in the designer, incidentally scaling the picture.
Make sure you’re in Frame Editing Mode before clicking that 3rd button, though. If you’re in Constraint Editing Mode, the 3rd button changes the constraints based on where you’ve positioned the elements, which isn’t likely what you want to do. Or at least I think that’s what it does; I haven’t actually checked it out.
Now if only I could figure out how to get my updated app icons to show up on the iPhone…